
Implementing Single-Area OSPFv2
Single-area OSPF starts with router ospf and a process number, then network commands that match interface addresses with a wildcard mask and put them in area 0. A 0 in the wildcard means the octet must match; 255 means ignore it. Then prove it step by step: the interfaces, the neighbours, the database, and the routes.
By Arif, founder of Daveth · Updated
The full 13 min walkthrough is in Daveth Pro (Network). See what the plan opens
What this page answers
How do you configure OSPF on a Cisco router?
Enter router ospf 1, set a router ID, and add network commands such as network 10.50.0.0 0.0.255.255 area 0. Each matching interface sends Hellos and has its subnet advertised. Read it in “BR1 joins”
How does the OSPF network command's wildcard mask work?
It says which octets of an interface's address to compare: 0.0.0.0 must match exactly, 0.0.0.255 compares the first three octets, and 255.255.255.255 matches every address. A 0 octet means must match; 255 means ignore. Read it in “What the wildcard does”
How do you verify OSPF?
One step at a time: show ip ospf interface brief for the interfaces OSPF runs on, then the neighbours, the database, and the routes. Each command proves its own step and no more. Read it in “Proving it, one step at a time”
R1 and R3 go first
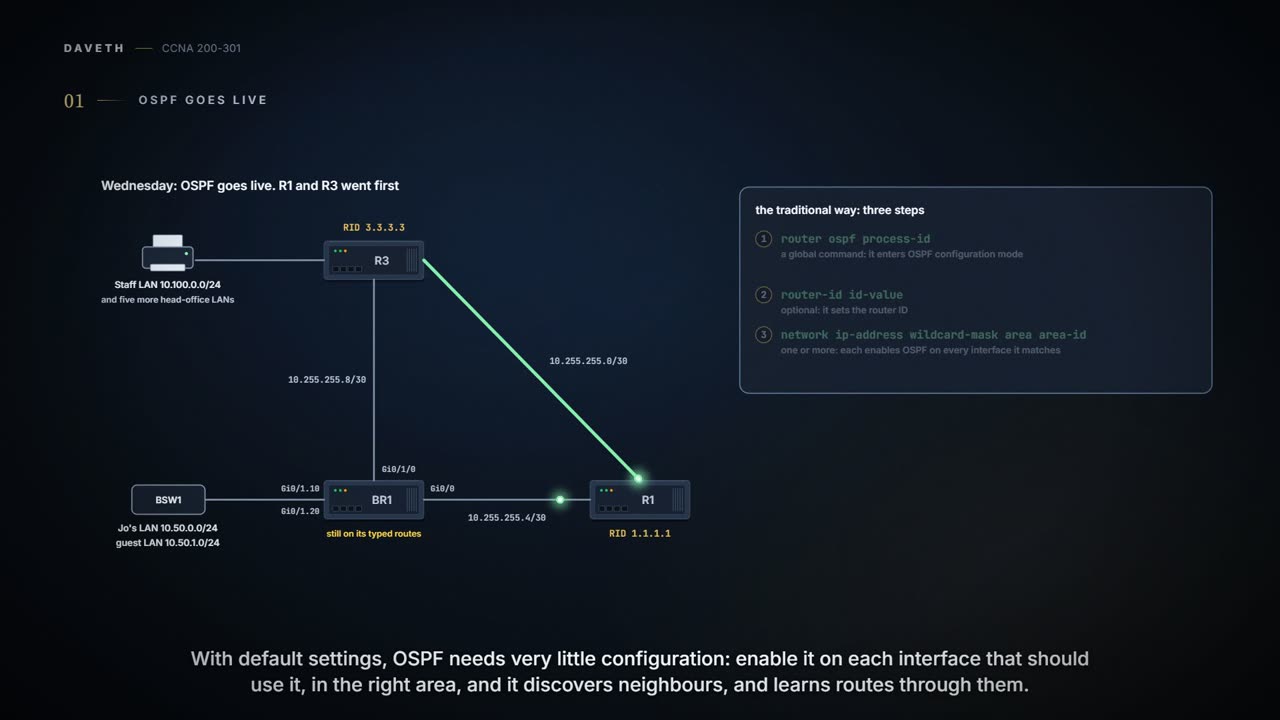
Wednesday, month three, week three. OSPF goes live today. Maya configured R1 first thing, and Ravi did R3; the two became neighbours over their own link. BR1 is still running on its typed routes.
R1 and R3 have been chatting all morning. BR1 hasn't said a word.
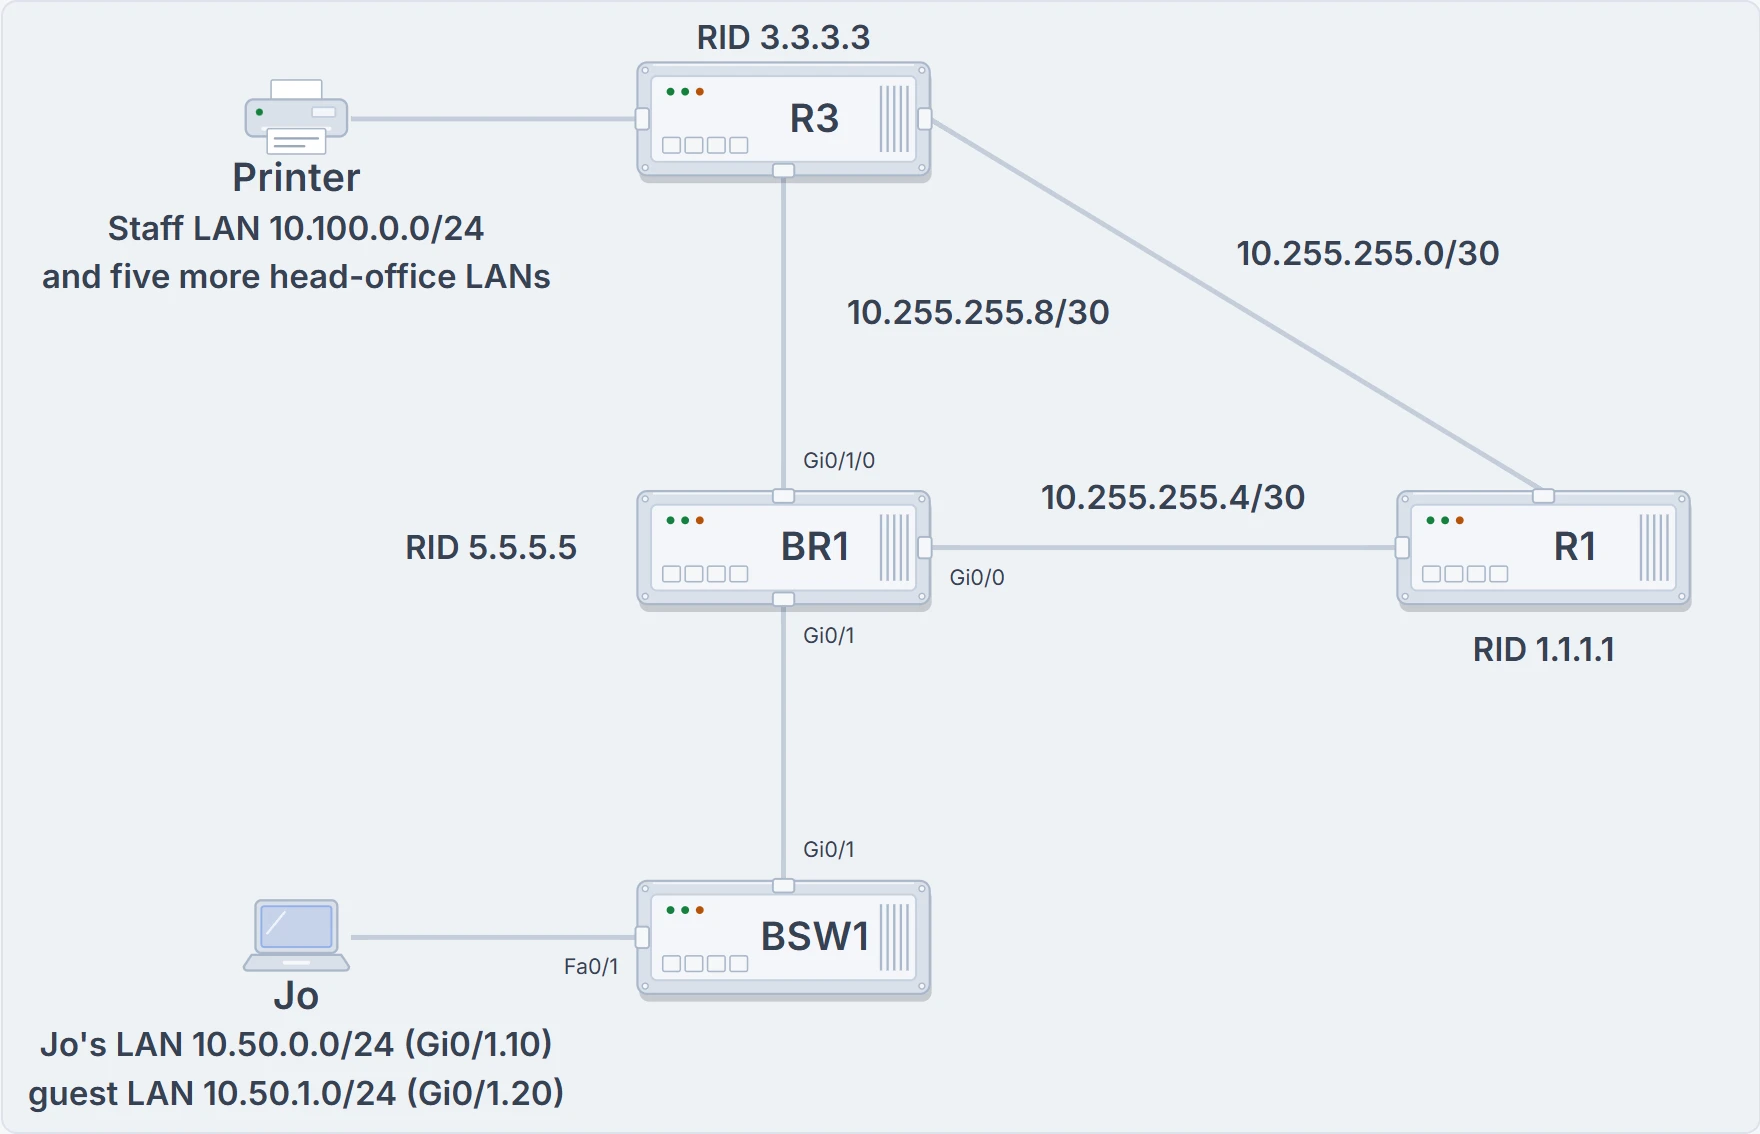
The company on Wednesday: three links, each a /30 from 10.255.255.0/24; head office's six LANs behind R3; the branch's two LANs on BR1's subinterfaces; and the router IDs from Tuesday's plan.
With default settings, OSPF needs very little configuration: enable it on each interface that should use it, in the right area, and OSPF discovers neighbours and learns routes through them. The traditional way takes three steps:
router ospfprocess-id, a global command, enters OSPF configuration mode for that OSPF process.- (Optional)
router-idid-value sets the router ID. Without it, the router chooses one by rules that 05.2.4 covers, loopback interfaces included. - One or more
networkip-address wildcard-maskareaarea-id commands enable OSPF on every interface they match, in the area listed.
The process ID only has to be unique on the local router: it lets one router run several OSPF processes, and it doesn't have to match between routers. Any whole number from 1 to 65,535 works. The area can be written as a whole number, 0 to 4,294,967,295, or in dotted decimal; this course writes whole numbers. (Interface names come in two shapes on these routers: built-in ports are two-part, like BR1's Gi0/0 and Gi0/1, and ports on an add-on card are three-part, like Gi0/1/0.) And notice what the network command doesn't do: it never names an interface. The router compares each network command with its own interface addresses and enables OSPF on the ones that match. So the command enables OSPF on interfaces indirectly, and on each matched interface OSPF then looks for neighbours and puts it in the area.
This morning Maya gave R1 router ospf 1, router-id 1.1.1.1 and network 10.255.255.0 0.0.0.255 area 0; Ravi gave R3 router ospf 1, router-id 3.3.3.3 and one command for all of its 10.x interfaces, network 10.0.0.0 0.255.255.255 area 0.
What the wildcard does
The network command compares its first parameter with each interface address, but not always the whole number. The wildcard mask says which octets to compare:
- 0.0.0.0: compare all four octets; the address must match exactly.
- 0.0.0.255: compare the first three octets; ignore the last.
- 0.0.255.255: compare the first two; ignore the last two.
- 0.255.255.255: compare the first octet only.
- 255.255.255.255: compare nothing; every address matches.
In short, a 0 octet in the wildcard means "must match" and a 255 means "ignore". You can think of it as a stencil laid over each of the router's own addresses: the 0 octets are the holes you read through. (Where it stops: a stencil shows you a shape; this one gives a yes or a no for each interface, and only for this router's own interfaces, never the rest of the network.) The same wildcard logic turns up again in access lists, later in the course.
A 255 in a wildcard is the router's way of saying "whatever".
There's a convention too: where a wildcard octet is 255, the address octet should be 0. The router accepts a command that breaks it, but changes those octets to 0 before saving it in the running config.
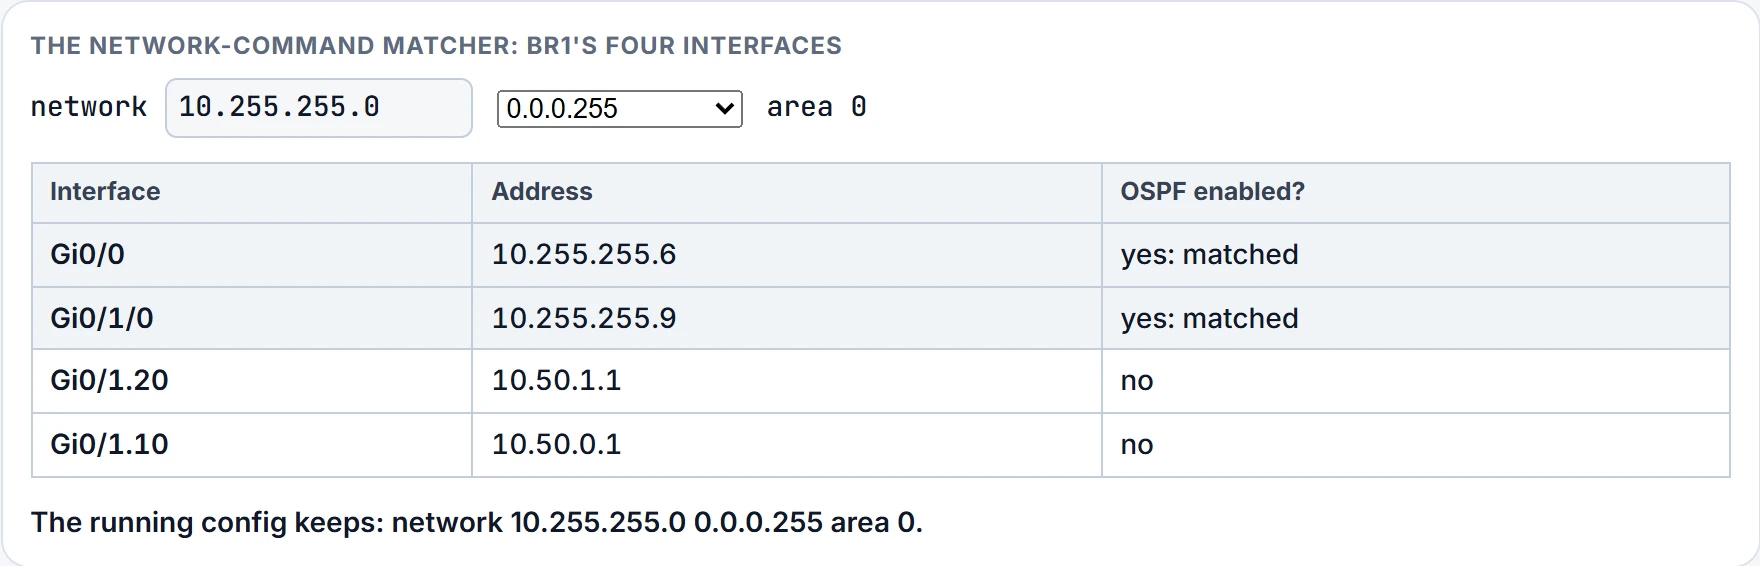
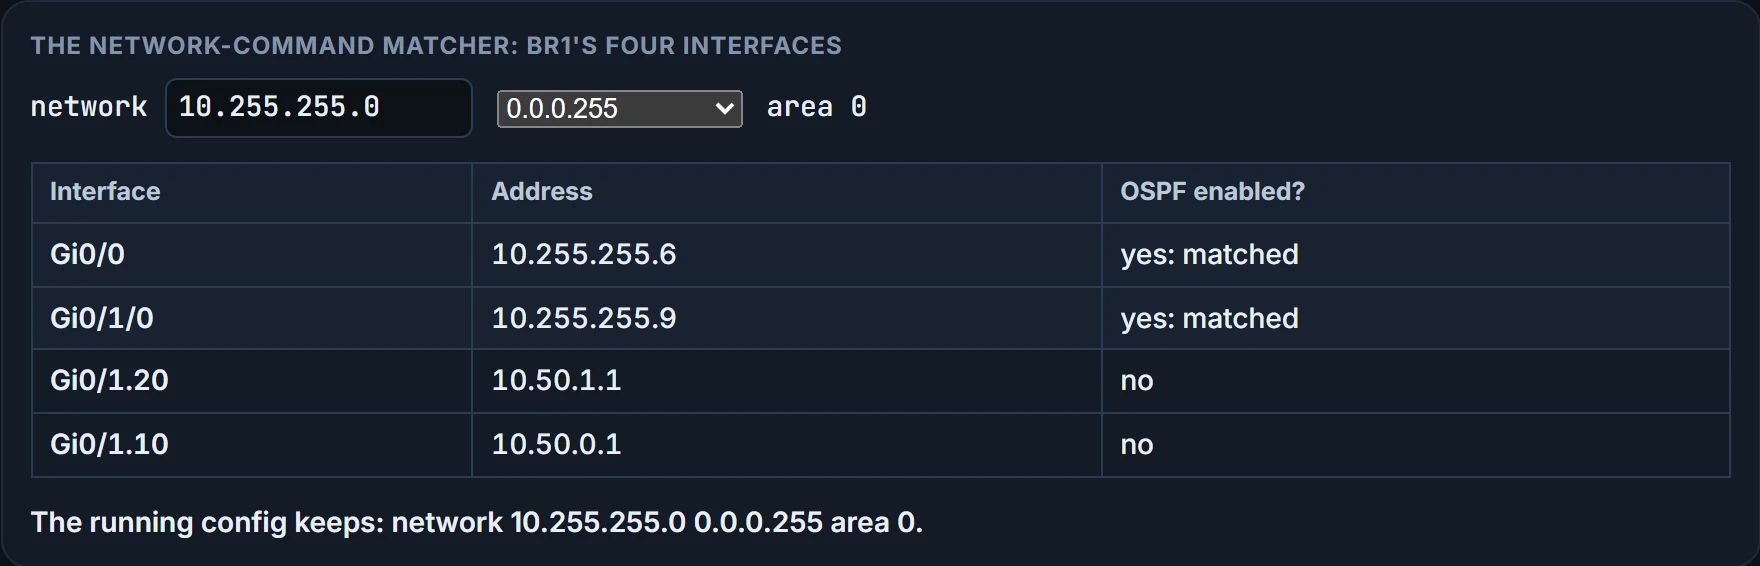
Several styles reach the same result: one command for everything, like R3's; one per subnet with 0.0.0.255; or one per interface, its exact address with 0.0.0.0, like network 10.255.255.9 0.0.0.0 area 0 for BR1's backup line. Here is one of them on BR1's four interfaces:
BR1 joins
BR1 has four interfaces with addresses: two WAN links starting 10.255.255 and two LAN subinterfaces starting 10.50. Two commands cover them, and the router ID from Tuesday's plan goes in too:
router ospf 1
 router-id 5.5.5.5
 network 10.50.0.0 0.0.255.255 area 0
 network 10.255.255.0 0.0.0.255 area 0
The first network command matches both LAN subinterfaces, so their subnets are advertised; the second matches both WAN links, so BR1 sends Hellos there and meets R1 and R3, and both neighbours reach full.
Proving it, one step at a time
OSPF works in three steps: neighbours, then the database, then SPF's routes. There's a command for each step, and a couple more for the configuration itself, and each proves its own step and no more. Start with the interfaces.
Before neighbours, check which interfaces OSPF is actually running on, since OSPF must be enabled on an interface before it looks for neighbours there. show ip ospf interface brief gives one line per OSPF interface; the command without brief gives about 20 lines each.
BR1# show ip ospf interface brief
Interface    PID   Area            IP Address/Mask    Cost  State Nbrs F/C
Gi0/0        1     0               10.255.255.6/30    1     BDR   1/1
Gi0/1/0      1     0               10.255.255.9/30    10    BDR   1/1
Gi0/1.20     1     0               10.50.1.1/24       1     DR    0/0
Gi0/1.10     1     0               10.50.0.1/24       1     DR    0/0
BR1#
All four are there, each with process ID 1 and area 0, its address, and a neighbour count: one each on the WAN links, none on the LANs. The cost column shows 1 on the gigabit links and 10 on the backup line, the numbers 05.2.1 used: the backup line runs at 10 Mbps, and by default OSPF bases each interface's cost on its bandwidth (05.2.1); the exact arithmetic is 05.2.4's. The State column is BR1's own role on each link. On Ethernet, even a two-router /30 link elects a designated router (DR) and a backup DR (BDR) (05.2.2). In this output BR1 is the BDR on both WAN links and the DR on its two LANs, where it's alone; how the DR is chosen comes later in the course.
BR1# show ip ospf neighbor
Neighbor ID     Pri   State          Dead Time   Address       Interface
1.1.1.1           1   FULL/DR        00:00:36    10.255.255.5  GigabitEthernet0/0
3.3.3.3           1   FULL/DR        00:00:33    10.255.255.10 GigabitEthernet0/1/0
BR1#
Read it right to left. Interface is BR1's own interface to that neighbour. Address is the neighbour's IP address on that link. State is FULL, the fully working state, and after the slash comes the neighbour's role on a link with a DR. Neighbor ID is the neighbour's RID, which is why readable RIDs help. The normal working states are:
- FULL/ -: full, and the link doesn't use a DR.
- FULL/DR and FULL/BDR: full, and the neighbour is the DR or the BDR.
- FULL/DROTHER: full, and the neighbour is neither, which means this router must be the DR or BDR.
- 2WAY/DROTHER: 2-way, and the neighbour is a DROther, which means this router is one too (05.2.2).
Next comes the LSDB. Neighbours exchange their LSDBs directly, or through the DR on a subnet that has one. show ip ospf database lists the LSAs; in a single area, once every neighbour is up and every LSA exchanged, every router lists the same ones. Here: three router LSAs (one per router) and three network LSAs (one per link with a DR and two routers), just as Tuesday's plan predicted. Then the routes. A quick check for a small network: count the subnets in the area, subtract the ones the router is connected to, and OSPF should supply the rest.
BR1# show ip route
! (the legend of codes is left out)
Gateway of last resort is 10.255.255.5 to network 0.0.0.0

S*    0.0.0.0/0 [1/0] via 10.255.255.5
      10.0.0.0/8 is variably subnetted, 16 subnets, 3 masks
O        10.30.0.0/24 [110/3] via 10.255.255.5, 00:02:11, GigabitEthernet0/0
C        10.50.0.0/24 is directly connected, GigabitEthernet0/1.10
L        10.50.0.1/32 is directly connected, GigabitEthernet0/1.10
C        10.50.1.0/24 is directly connected, GigabitEthernet0/1.20
L        10.50.1.1/32 is directly connected, GigabitEthernet0/1.20
O        10.97.0.0/24 [110/3] via 10.255.255.5, 00:02:11, GigabitEthernet0/0
O        10.98.0.0/24 [110/3] via 10.255.255.5, 00:02:11, GigabitEthernet0/0
O        10.99.0.0/24 [110/3] via 10.255.255.5, 00:02:11, GigabitEthernet0/0
O        10.100.0.0/24 [110/3] via 10.255.255.5, 00:02:11, GigabitEthernet0/0
S        10.100.0.50/32 [1/0] via 10.255.255.10
O        10.200.0.0/24 [110/3] via 10.255.255.5, 00:02:11, GigabitEthernet0/0
O        10.255.255.0/30 [110/2] via 10.255.255.5, 00:02:09, GigabitEthernet0/0
C        10.255.255.4/30 is directly connected, GigabitEthernet0/0
L        10.255.255.6/32 is directly connected, GigabitEthernet0/0
C        10.255.255.8/30 is directly connected, GigabitEthernet0/1/0
L        10.255.255.9/32 is directly connected, GigabitEthernet0/1/0
BR1#
Seven O routes: head office's six LANs and the R1-R3 link, all through R1 over the fibre. Take 10.100.0.0/24: in [110/3], 110 is the administrative distance, OSPF's default, and 3 is the OSPF metric: BR1's fibre (1), R1's link to R3 (1), R3's LAN (1). Then the forwarding instructions: next hop 10.255.255.5, out Gi0/0. The typed routes haven't gone anywhere: the default route still wins for everything else, and for 10.100.0.50 the /32 host route is longer than OSPF's /24, so it still wins for that one address (05.1.3).
FULL is a great sign. It just isn't a route.
Continue the lesson
The whole lesson, with its drawings and its questions. The rest of this section and 3 more after it.