
Networking and remote access: SSH, TLS front doors, Tailscale and WireGuard, proxies
A program listening on 127.0.0.1 accepts only connections from the same machine, so a laptop knocking on the server's real address gets connection refused. Reach it safely through an SSH tunnel instead of opening the port. Use keys, ssh-agent and a config file with ProxyJump and LocalForward.
What this page answers
Why do I get connection refused from another machine?
The program printed 127.0.0.1, the loopback address, so it only accepts connections from its own machine. Nothing was listening on the real network address, so the server refused at once; a firewall would usually drop the packets and the connection would hang. Read it in “It runs. You just can't reach it.”
How do I reach a GPU server through a jump host?
Use an SSH key and a ~/.ssh/config entry. ProxyJump hops through the bastion automatically and LocalForward sets up the tunnels every time you connect, so ssh with the host's short name gives you a shell and the tunnel. Read it in “SSH, properly”
It runs. You just can't reach it.
You start JupyterLab on a remote GPU server. It prints a link, and everything looks fine. From your laptop, on the same network, you try to open it:
gpu-box$ jupyter lab --no-browser --port 8888
    Jupyter Server is running at:
    http://127.0.0.1:8888/lab?token=3f2a…
laptop$ curl -I http://gpu-box:8888
curl: (7) Failed to connect to gpu-box port 8888: Connection refused
Outputs on this page are realistic examples. Commands, options, addresses and configuration files are real.
Jupyter is running, and the network between the two machines works: you can SSH in. Why is the connection refused?
- A firewall is blocking port 8888
- Jupyter only listens for connections from its own machine
- Jupyter crashed after printing the link
Answer. Look at the address it printed: 127.0.0.1. That's the loopback address, a private, internal line every machine has to itself. A program listening on 127.0.0.1 only accepts connections that come from the same machine. Your laptop knocked on the server's real network address, where nothing was listening, so the server answered “refused” at once. A firewall would usually just drop the knock silently, so the connection would hang until it timed out instead.
gpu-box$ ss -tlnp | grep 8888
LISTEN 0  128  127.0.0.1:8888  0.0.0.0:*  users:(("jupyter-lab",pid=4021,fd=6))
That's a good default, because Jupyter can run any code on the server. The right fix isn't to open it to the network. It's to bring yourself to the server with an SSH tunnel: ssh -N -L 8888:127.0.0.1:8888 gpu-box, then open http://localhost:8888 on the laptop. The rest of this lesson explains both halves: who can reach what, and how tunnels work.
Who can reach a port?
Whether someone can reach a service depends on a stack of decisions, and every one of them has to say yes. Which address the service listens on: 127.0.0.1 means this machine only, and 0.0.0.0 means every network the machine is on. The machine's own firewall, like UFW. Whether Docker published the port, because Docker's rules bypass UFW (Down the Overlay). And, for the internet, the cloud firewall in front of the machine.
Read the table in the drawing below. Each row is a different person or program trying to reach it, with a yes or no and the reason.
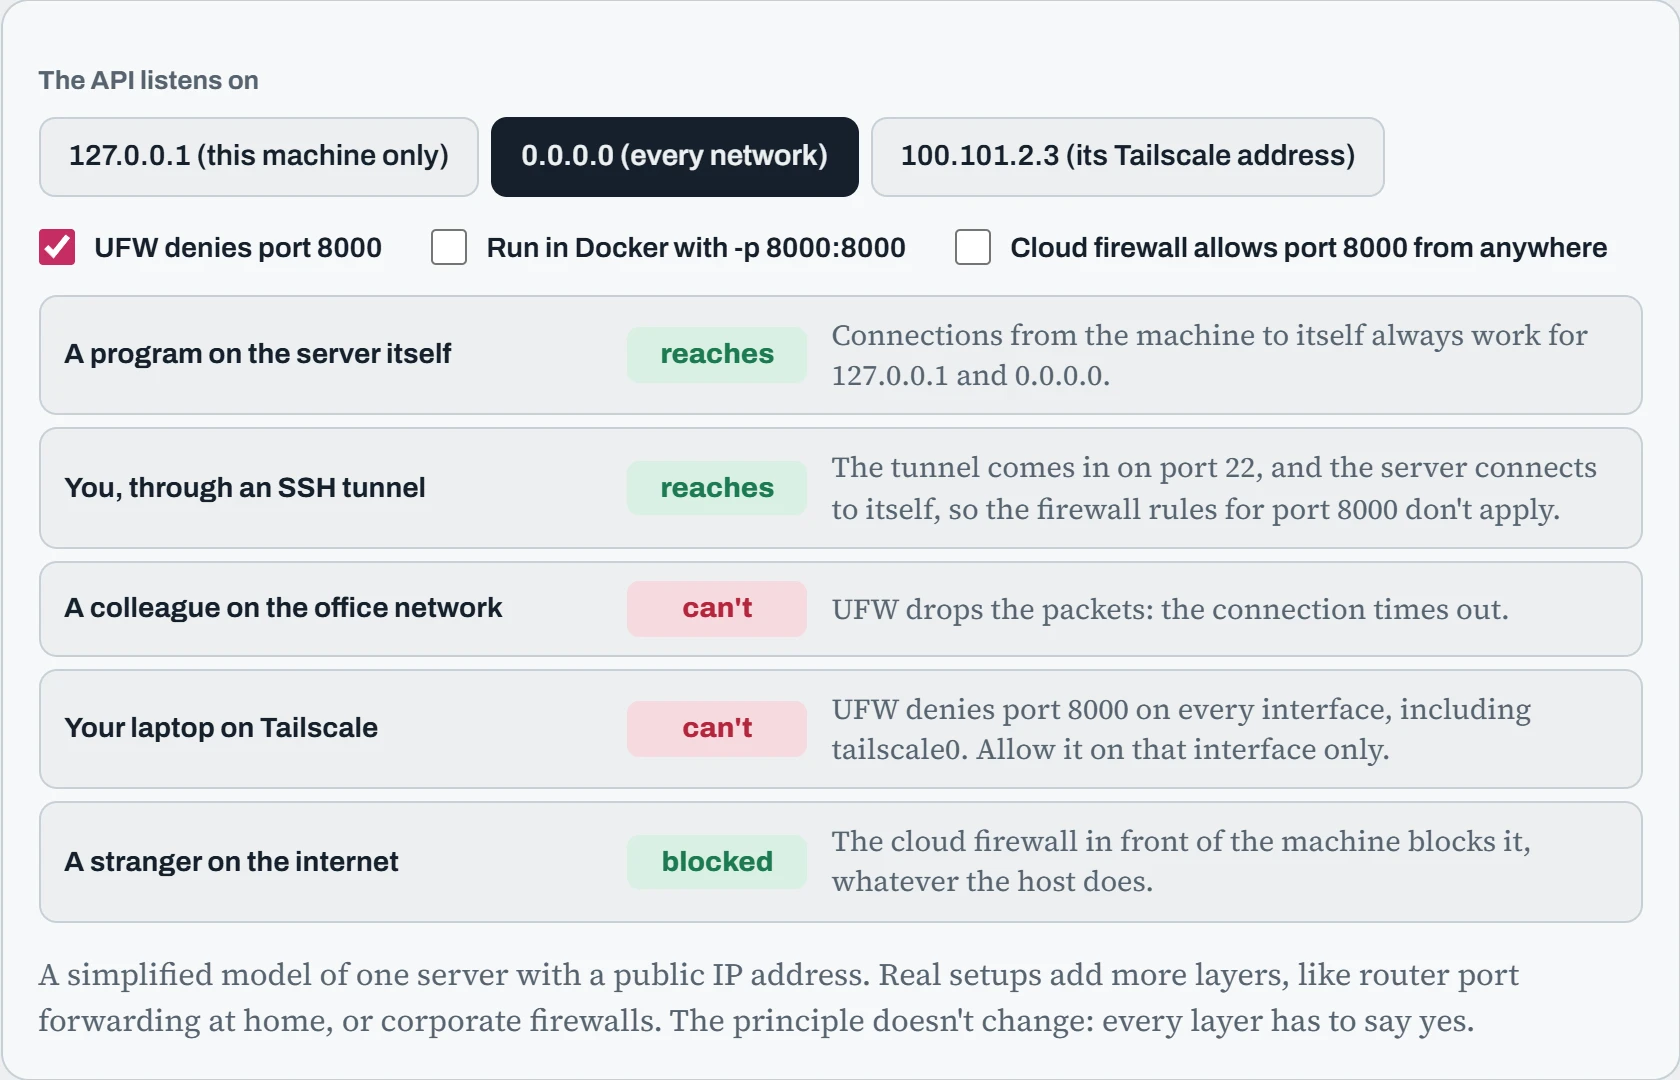
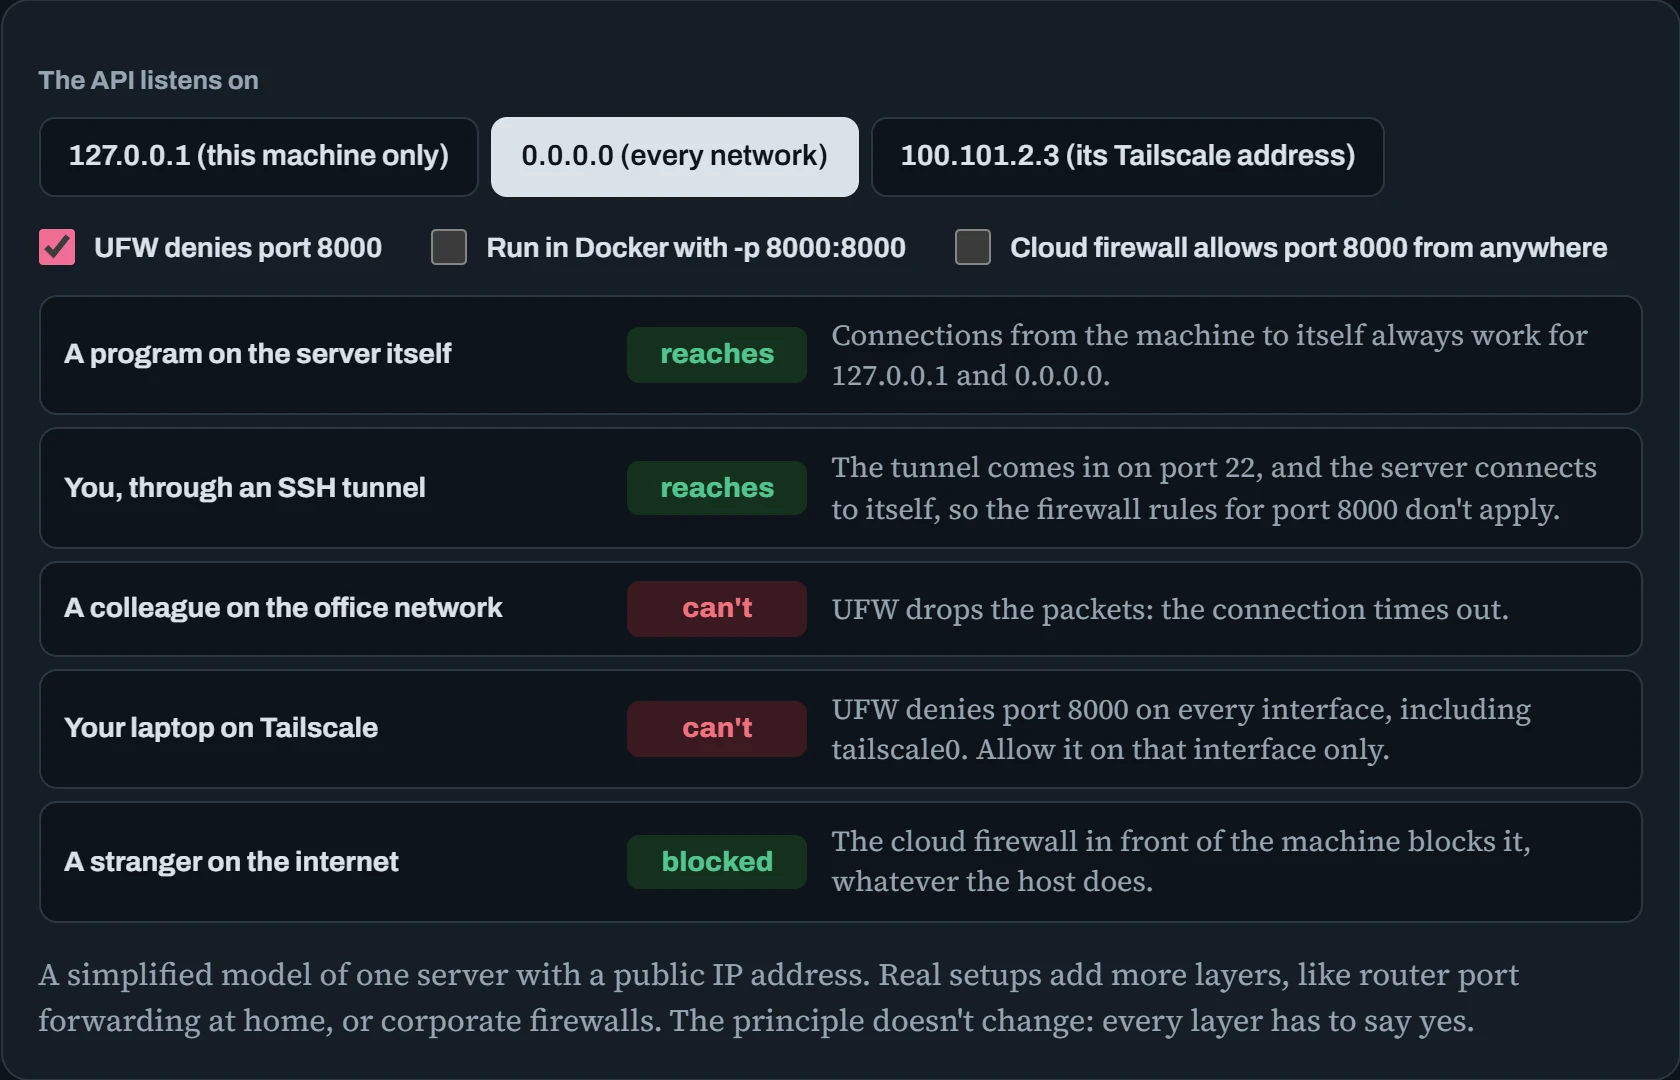
Notice the trap. With UFW denying the port, the API looks safe. Run it in Docker instead, and the internet can reach it, as long as the cloud firewall allows it, because Docker's published port skips UFW. The safest setups listen on 127.0.0.1 and use a tunnel, or listen only on a private network address. Then even a mistake in the firewall layers can't expose the service.
Predict. Your API listens on 127.0.0.1. Can you reach it through an SSH tunnel from your laptop, even with UFW denying port 8000?
Answer. Yes. The tunnel enters the server through the SSH port (22), which is allowed. Then the server itself makes the final connection to 127.0.0.1:8000, a connection from the machine to itself. UFW is filtering traffic arriving from outside on port 8000, and nothing arrives that way.
That's why tunnels are so useful. Exactly one port is open (SSH, protected by keys), and every other service stays private, reachable only by people who can already log in.
Seeing the network
A handful of commands answer most network questions. ip addr lists the machine's addresses. ip route shows where traffic goes. ss -tlnp shows what's listening, and on which address. dig checks that a name turns into the right address. mtr traces the path to another machine, and shows where packets get lost or slow:
$ ip -brief addr
lo          UNKNOWN   127.0.0.1/8
eno1        UP        10.20.4.17/24
tailscale0  UNKNOWN   100.101.2.3/32
$ ip route get 1.1.1.1
1.1.1.1 via 10.20.4.1 dev eno1 src 10.20.4.17
$ dig +short gpu-box.lab.internal
10.20.4.17
$ mtr -rwc 20 gpu-box.lab.internal | tail -2
  2.|-- 10.20.4.17   0.0%   20   0.4   0.4   0.3   0.6   0.1
This machine has three ways in: the loopback (lo), its office network (eno1, address 10.20.4.17), and a Tailscale private network (tailscale0). A service bound to one of those addresses is reachable only through that door, which is exactly what the explorer above models. When a name doesn't work but the address does, the problem is DNS. When mtr shows loss at one hop, the problem is that link, not your service.
SSH, properly
SSH is how you reach remote GPU machines, and a few habits make it both safer and easier. Use a key, not a password: ssh-keygen -t ed25519 makes one, and ssh-copy-id gpu-box installs it on the server. Let ssh-agent hold the unlocked key, so you type its passphrase once per session. And write a ~/.ssh/config, so long commands become short names.
Many servers are only reachable through a bastion (or jump host): a single, hardened machine that's the only door in. ProxyJump hops through it automatically. And LocalForward sets up tunnels every time you connect. Fill in the builder to get both the command and the config block:
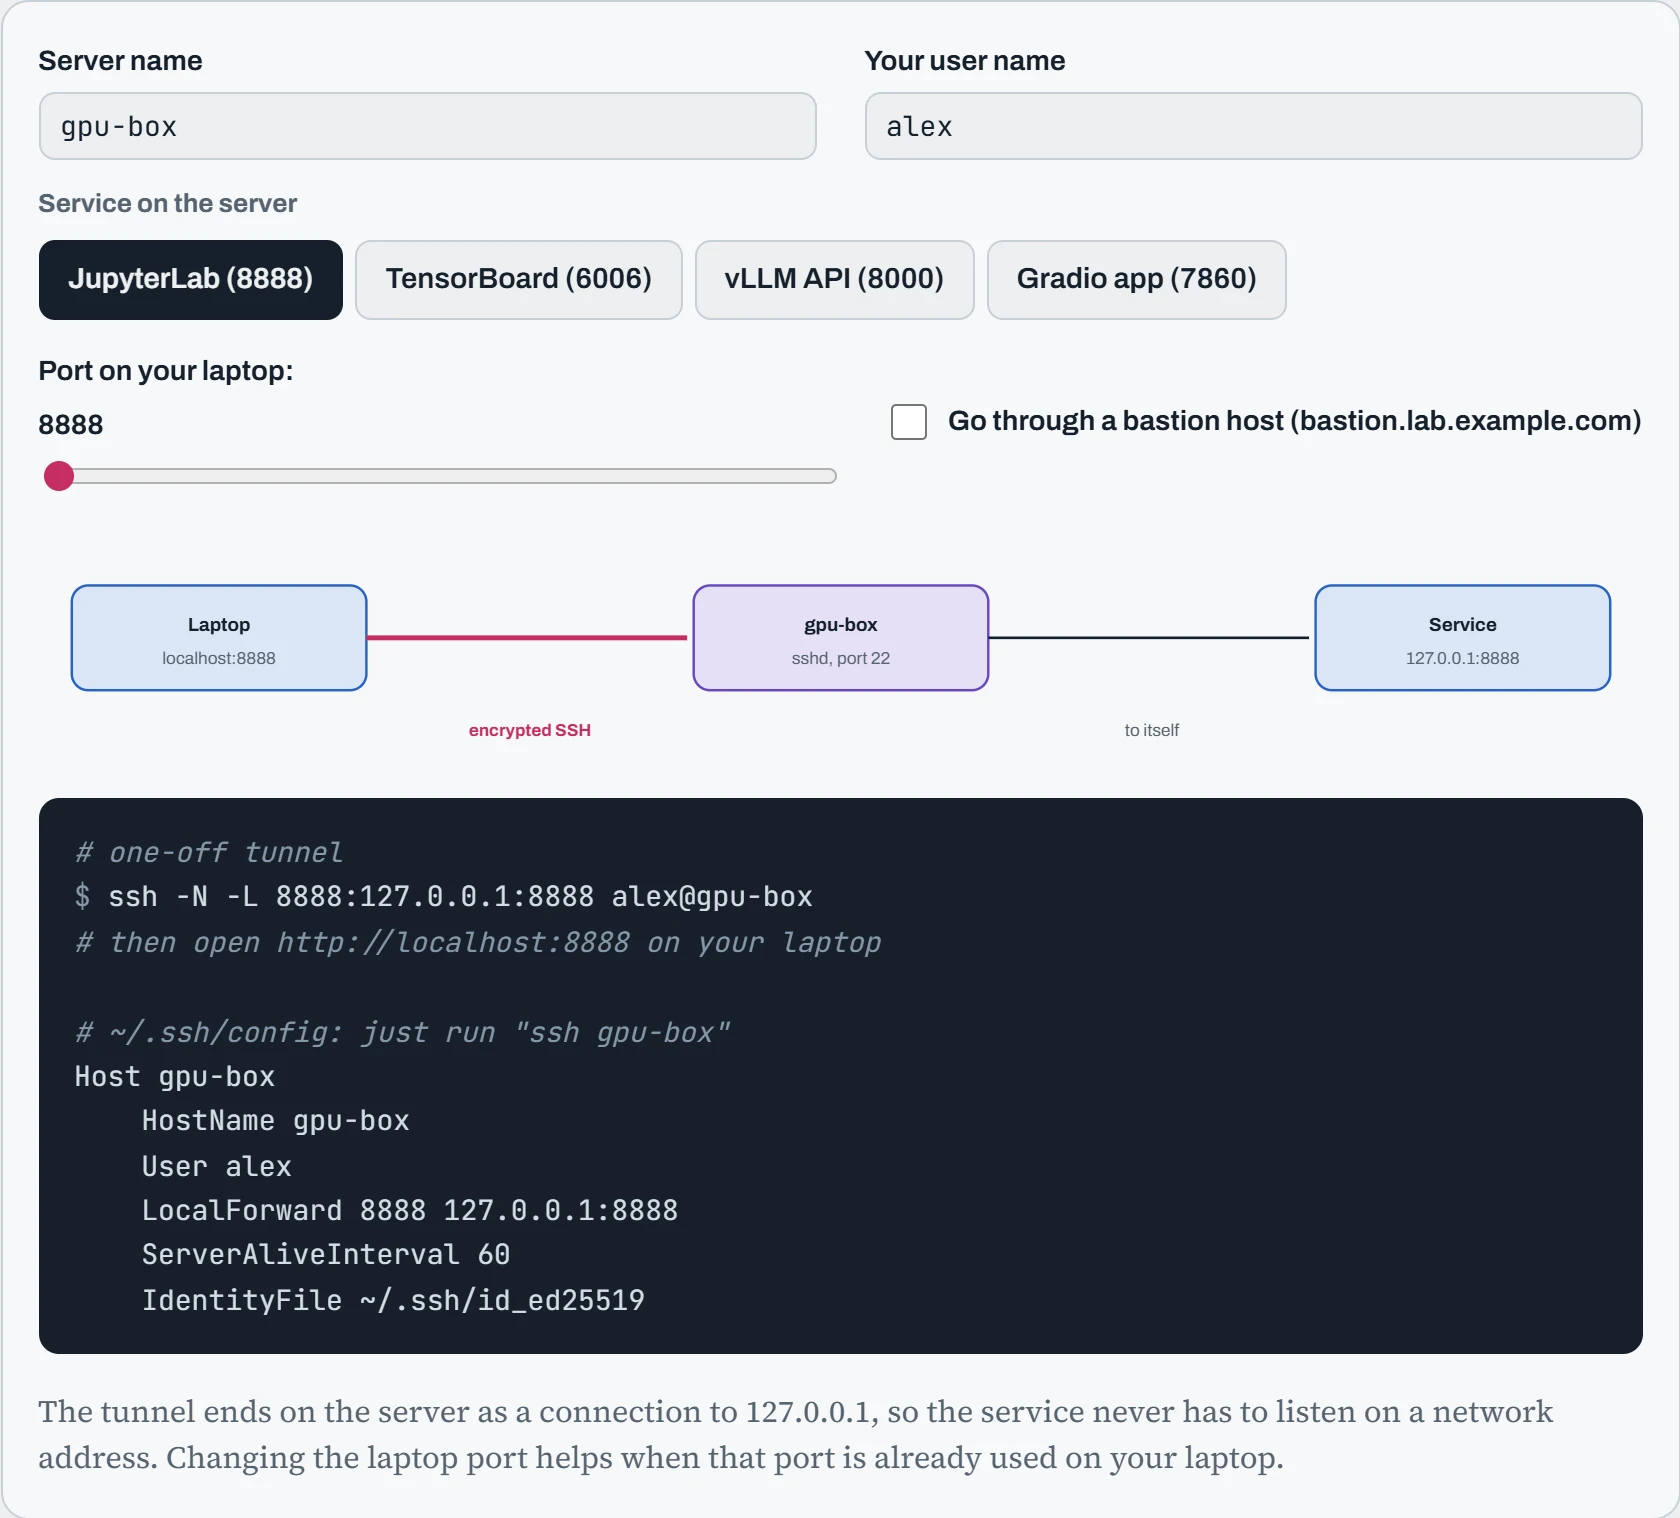
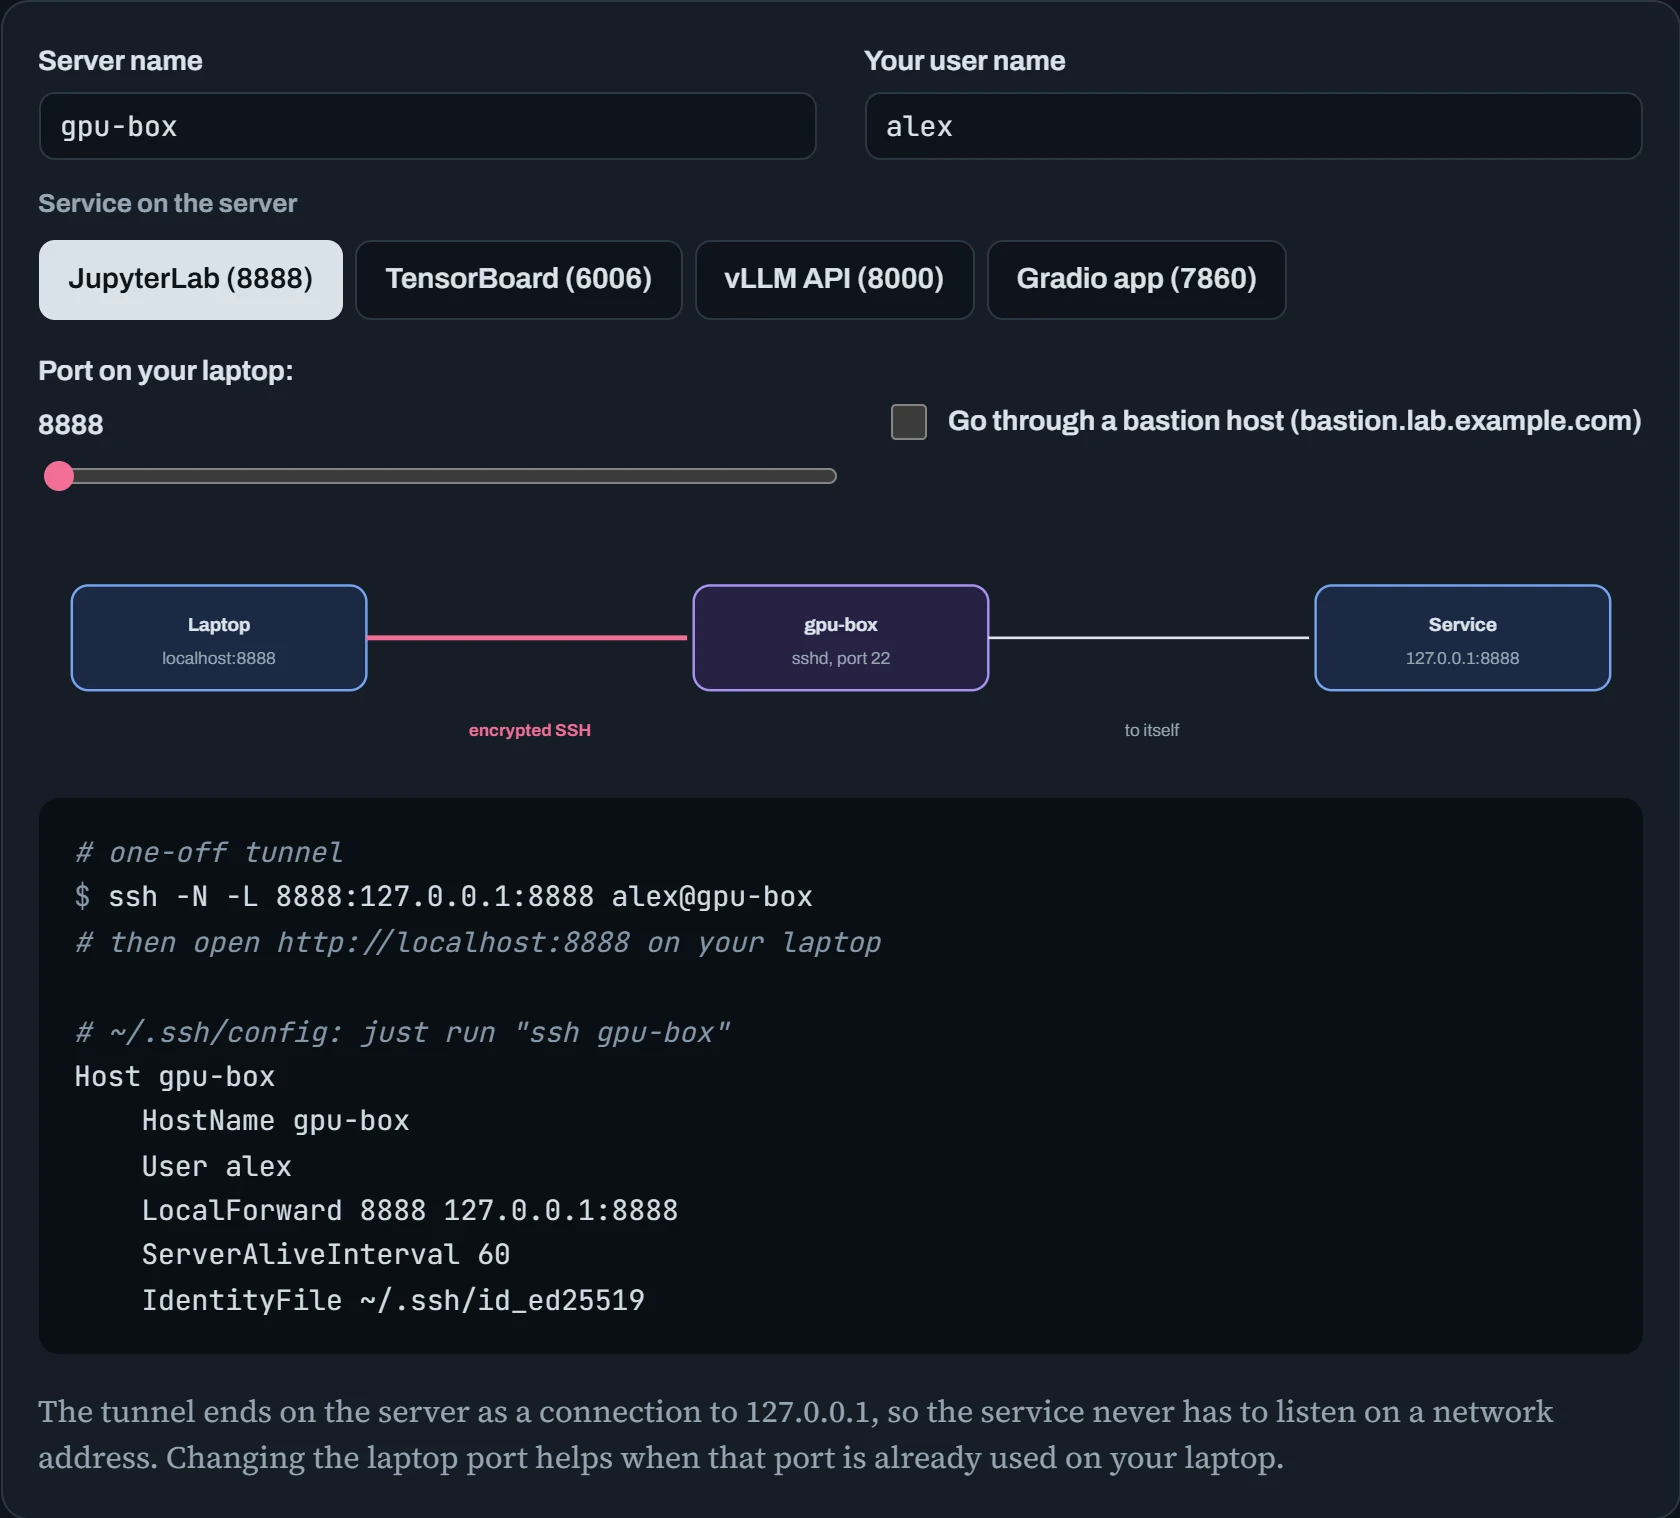
With the config block saved, ssh gpu-box alone gives you a shell and the tunnel, and ssh -N gpu-box just the tunnel. Editors like VS Code's Remote-SSH read the same config file, so the jump host and tunnels work there too. ServerAliveInterval sends a small keep-alive every minute, so tunnels don't silently die when a router forgets idle connections.
On the server side, harden SSH in a file under /etc/ssh/sshd_config.d/: PasswordAuthentication no (keys only) and PermitRootLogin no. Then reload with sudo systemctl reload ssh, and keep your current session open until you've proven that a new login works.
Talking to model APIs
Most model servers speak HTTP with JSON, in the OpenAI style (Down the Bits). curl is the universal test tool. Answers often come back streamed, one small piece at a time, as server-sent events (SSE): lines starting with data:, ending with data: [DONE]. Add -N so curl prints each piece the moment it arrives instead of buffering:
$ curl -N http://localhost:8000/v1/chat/completions -H "Content-Type: application/json" \
    -d '{"model":"qwen2.5-7b","stream":true,"messages":[{"role":"user","content":"Say hi"}]}'
data: {"choices":[{"delta":{"role":"assistant","content":""},"index":0}]…}
data: {"choices":[{"delta":{"content":"Hi"},"index":0}]…}
data: {"choices":[{"delta":{"content":"!"},"index":0}]…}
data: [DONE]
Streaming is why model APIs behave differently from normal web APIs when something sits in between. A proxy that waits to collect the whole response before passing it on turns a smooth stream into one long silence and a sudden burst. A proxy with a 60-second timeout cuts off long generations halfway. Both problems belong to the next section.
A front door with TLS
When a model API really must be reachable by other people, don't expose the model server directly. Put a reverse proxy in front: a small web server that faces the network, handles HTTPS encryption (TLS) and logins, and passes requests to the model server listening privately on 127.0.0.1. Caddy makes this short. It even gets and renews a free TLS certificate from Let's Encrypt automatically:
# /etc/caddy/Caddyfile
llm.example.com {
    basic_auth {
        team $2a$14$Qm…               # generate with: caddy hash-password
    }
    reverse_proxy 127.0.0.1:8000 {
        flush_interval -1            # pass streamed pieces through immediately
        transport http {
            read_timeout 10m         # long generations shouldn't be cut off
        }
    }
}
The same ideas in nginx are proxy_buffering off; for streaming, proxy_read_timeout 600s; for long answers, and the Upgrade/Connection headers for apps that use WebSockets, like many chat front-ends and Gradio. Whatever proxy you use, the model server stays on 127.0.0.1, so the proxy, with its TLS and logins, is the only way in.
Predict. Your model API sits behind Caddy at https://llm.example.com, with a login. A stranger skips the proxy and connects straight to http://<server-ip>:8000, the model server's own port. What happens?
Answer. It depends entirely on where the model server listens. On 127.0.0.1:8000, the stranger gets “connection refused”, because the port isn't on the network at all, and the proxy really is the only way in. On 0.0.0.0:8000, they bypass the login completely, unless a firewall stops them.
That's the rule for every front door: the proxy only protects what can't be reached around it. Bind the service behind it to 127.0.0.1 (or a container network without published ports), and check from outside with nc -vz <server-ip> 8000 that it's truly closed.
Continue the lesson
The whole lesson, with its drawings and its questions. 5 more sections after the ones above.